Road Cycling from Tumut
About.
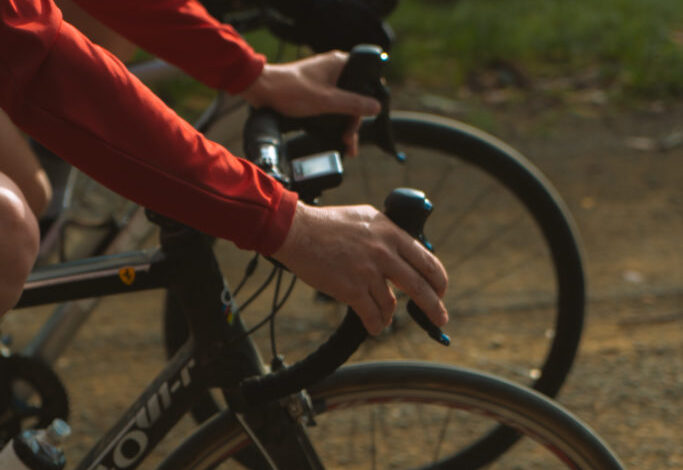
Road Cycling – Tumut
We have many wonderful road rides around Tumut, to suit cyclists of most abilities, with gorgeous views on some relatively quiet country roads. Below you’ll find details of just some of what’s on offer.
All cycling routes described start at the corner of Fitzroy St (Snowy Mountains Highway) and Wynyard St, Tumut.
Cyclist must obey NSW road rules (available here), and we suggest following these safe riding tips. Download the maps and route information as a PDF Part 1 here and Part 2 here.
Please note that adequate fluid and nutrition requirements should be carried as there are no resupply points on the majority of the described routes, (the exceptions being routes that include the towns of Gundagai and Adelong, both of which offer cafes, pubs and shops to meet your needs).
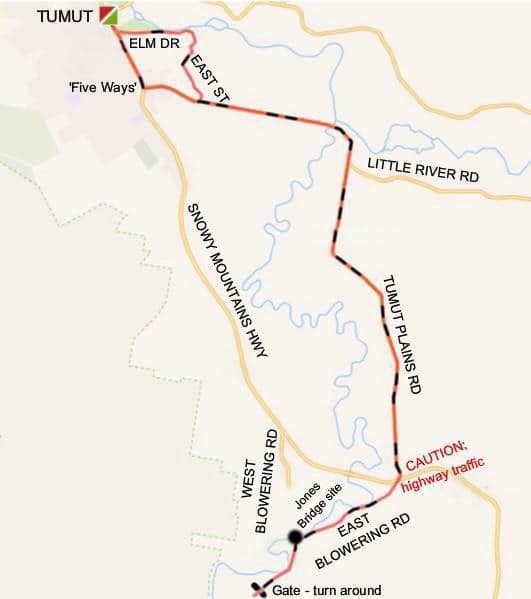
Jones Bridge – 27km (Easy)
The easiest and safest open road ride close to Tumut – almost flat the whole way apart from two short, very slight rises which should not present any difficulty to most cyclists. The route traverses fertile flats of the Tumut River, sometimes skirting very close to its banks. The ‘out-and-back’ nature of this route allows turn-around and return at any point.
- Depart Tumut south along Fitzroy St (Snowy Mountains Highway), turning left at the ‘Five Ways’ onto Tumut Plains Road.
- Shortly after crossing historic ‘Junction Bridge’, and then the much smaller ‘Lagoon Bridge’, pass by Little River Rd. intersection on your left. Continue straight ahead.
- 5.3 km further on the Tumut Plains Rd meets with the Snowy Mountains Highway. Exercise caution at this GIVE WAY crossing as traffic coming along the highway to the left is often travelling quite fast downhill and sight distance is restricted.
- Cross straight over the highway onto East Blowering Road. After 2 km a hard left-hand corner joins onto a section of the now defunct Monaro Highway (pre 1965). Site of the old ‘Jones Bridge’ crossing over the Tumut River is to your right.
- Passing by an avenue of old Lombardy Poplars, a gate is soon encountered, marking the ride turn-around point.
- Retrace your outward route along Tumut Plains Rd until, just past the 50 kph speed restriction sign at the edge of town, East St is encountered as a crossroad. Turn right onto East St
- Ride to the end of East St and turn right at the T-intersection onto Elm Drive. Lined by towering English Elm trees, this road follows around the edge of the Tumut Racecourse with Tumut River near at hand.
- Up a gentle incline past the swimming pool, a right-hand turn onto Fitzroy St brings the route to conclusion.
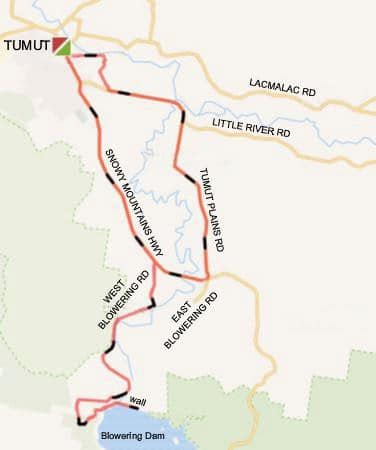
Blowering Dam Spillway – 41km (Medium)
This satisfying ride out to Blowering Dam & Power Station offers choice for outward or return journeys – choosing either the sometimes busy Snowy Mountains Highway or the much quieter, and flatter, Tumut Plains Rd route, or a mix of the two as is described here. (To avoid all but a 1.8 km linking section of the highway, riders can opt to use departure directions on Jones Bridge map above, turning right at end of Tumut Plains Rd when the Snowy Mountains Highway is reached.)
- Head south out of Tumut along Fitzroy St (Snowy Mtns Highway).
- Ride 7.5km and turn right off the highway onto West Blowering Rd (Dam Road). This intersection is well signposted.
- After some great cycling, the massive wall of Blowering Dam comes into full view and very shortly after, the Blowering power station.
- Turn left and ride around the back of the power station to ‘Brandy Mary Park’, at the very foot of the wall. There are flush toilets and barbecue/picnic facilities here should you wish to rest a while.
- To continue on to the top of the dam wall, ride back to the power station and turn left up a short, punchy rise passing through a double gate which is usually open for public access.
- The road winds up a narrow, forested valley, passing by the site of the Blowering Dam construction camp adjacent to a hard left-hand corner. More climbing soon enough brings riders to a saddle and another hard left-hander.
- Follow signs to viewing point & spillway. It is permissible to cycle across the 747 metre long crest of the dam wall to the spillway on the eastern side. The view is well worth it – take your camera!
- Retrace your way along West Blowering Rd to its intersection with the Snowy Mountains Highway.
- Turn right and ride 1.8 km to link with the Tumut Plains Rd / East Blowering Rd cross-road.
- Turn left onto Tumut Plains Rd and return to Tumut as per last three points of directions for Jones Bridge map above.
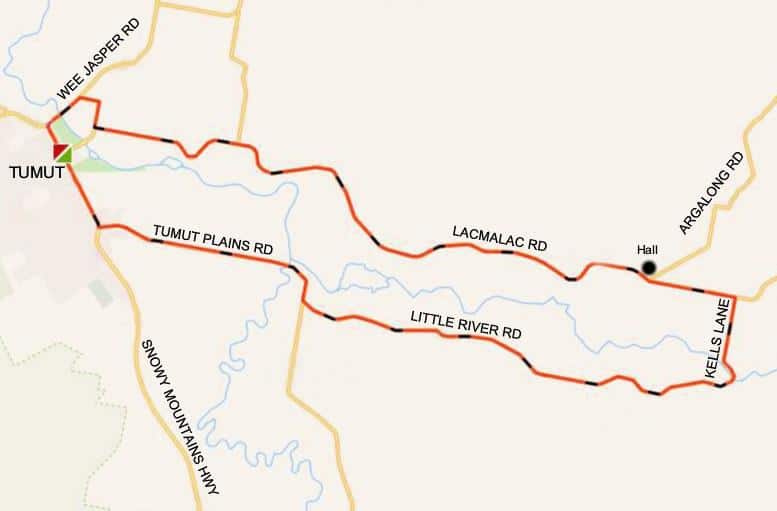
Lacmalac Loop – 27km (Easy)
A very popular circuit which takes in the scenic flats of both Tumut & Goobarragandra Rivers.
- Head south out of Tumut along Fitzroy St, (Snowy Mountains H’way) turning left onto Tumut Plains Rd.
- Soon after crossing the historic truss bridge at ‘The Junction’, turn left onto Little River Rd & follow it to the low-level bridge crossing over Goobarragandra River, where Kells Lane commences.
- The gently rising Kells Lane shortly brings you to a T-intersection with Lacmalac Rd.
- Turn left at tree in middle of road & follow Lacmalac Rd back to Tumut. There a few minor rises along this undulating section, but nothing too demanding.
- Nearing Tumut, at the concrete section of road surface, a left turn leads across the old town bridge (cyclists /pedestrians), while a right turn enters town by way of Wee Jasper Rd & the ‘Pioneer Bridge’.
- Riding this route in the suggested anti-clockwise direction is a little easier as it negates a short, steep climb at the eastern end of Little River Rd.
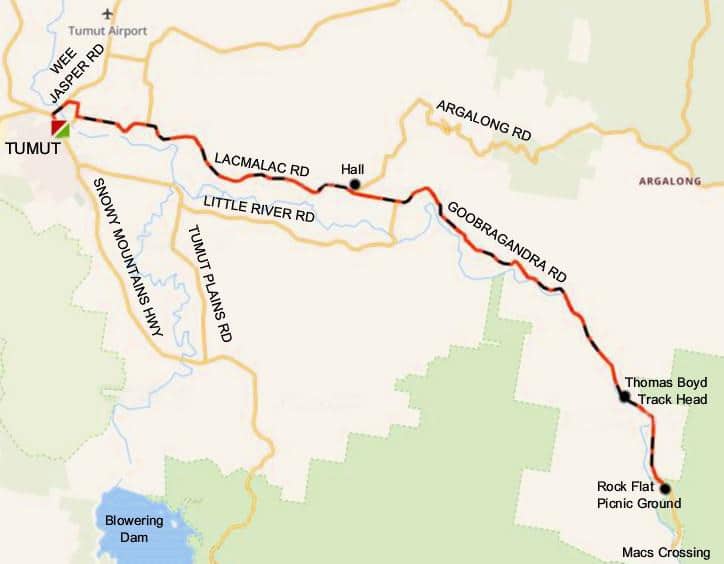
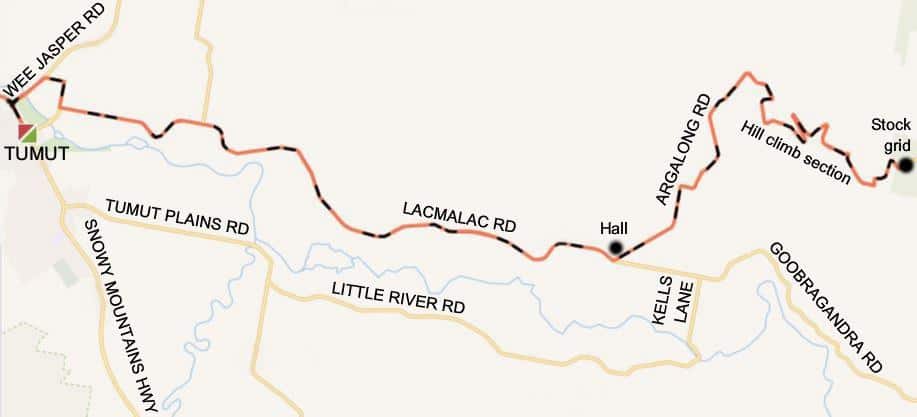
Goobarragandra – Rock Flat – 56km (Medium)
Picturesque medium grade ride on a quiet rural road up Goobarragandra valley, turning around at Rock Flat Picnic Area.
- Depart Tumut via Wee Jasper Rd and turn right to Lacmalac soon after crossing the ‘Pioneer Bridge’.
- Proceed along full length of Lacmalac Rd, passing the Lacmalac Memorial Hall & Argalong Rd on your left.
- Continuing on straight ahead the road becomes more ‘up and down’ until levelling out as it skirts close to the bank of Goobarragandra River.
- ‘Thomas Boyd Track Head’, part of the Hume & Hovell Walking Track infrastructure is passed on your right. There are flush toilets and barbecue/picnic facilities here should you wish to rest a while.
- After crossing the small bridge spanning Stony Creek, a few more short hills are encountered until Rock Flat is reached on a small clearing beside the river.
- It is possible to add another 4 km (return) to end of the tar at ‘Macs Crossing’ bridge, however this entails a short 17% hill just past the Rock Flat turn-around.
- Refer to above map of Lacmalac Loop for an alternative outwards or return route via Little River Road.
Download details of the above rides here.
Argalong Hill – 46km (Advanced)
Popular amongst experienced local cyclists, the Argalong Hill is a sustained 328 metre climb over a distance of 5.5 km. However, it should be approached with great caution as the hill section is narrow and winding with a number of blind corners. Exercise considerable care during descent.
- Depart Tumut as per Goobarragandra – Rock Flat or, alternatively, Lacmalac Loop map directions above.
- Turn onto Argalong Rd (NOTE: no signboard) just beside the Lacmalac Memorial Hall.
- After an easy km or so, the road begins the rise, first gently and then steepening after a small watercourse is crossed at the foot of Argalong Hill.
- Ride turn-around point is at the stock grid, beyond which pine plantation commences.
- Return to Tumut via outward route or alternative.
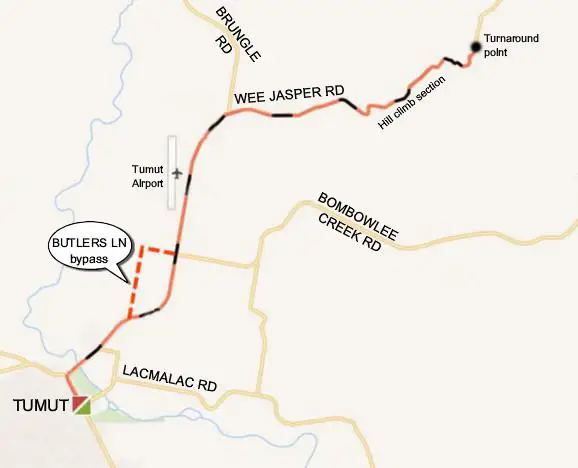
Wyangle Hill – 21km (Easy)
The Wyangle Hill climb has long been used as a training route for local cyclists due to its handy proximity to Tumut and generally low volume of rural traffic. ‘Icing on the cake’ when reaching the top is the magnificent views back towards Bombowlee and the Tumut valley.
- Depart north-west along Fitzroy St (Snowy Mountains Hwy). Just before reaching the caravan park, turn right onto Wee Jasper Rd and cross the ‘Tumut Pioneer Bridge’.
- If riding this route any day other than Sunday it is suggested that the Butlers Lane bypass be used to ease interaction with logging traffic. (See “Please note” below) The sign-posted turnoff onto this quiet back road is encountered on the left 900 metres after crossing Tumut River.
- Soon after passing Tumut Airport, Brungle Rd enters from the left as a T-intersection. Do not turn, continue straight ahead.
- After another km or so the road begins to ramp up and from here on, to the top, the ride is graded as ADVANCED. Sealed pavement width decreases as a series of steep hillside cuttings and tight corners are encountered. Caution is advised.
- The end of the tar seal marks the turnaround point and a chance to catch your breath!
- Return to Tumut by way of outward route.
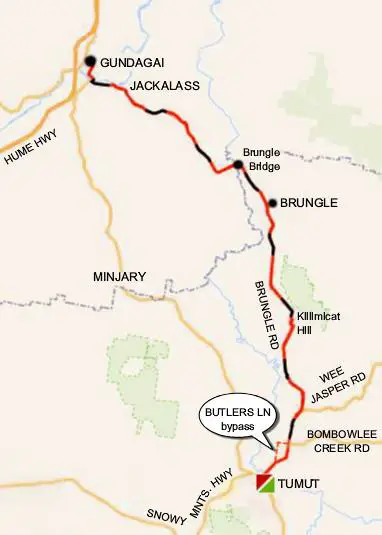
Brungle and Gundagai – 40km – 75km (Medium)
Cycling to Gundagai is a longer, medium grade ride but quite achievable for the intermediate rider looking for an extending challenge and with sufficient time to spare. Although there are a number of hills both ways, all can be surmounted with a little patience. Two options to shorten this route, while still providing a satisfying and scenic ride, are offered.
- Depart Tumut as per first two points of WYANGLE HILL map directions above, noting the Butlers Lane bypass option to ease interaction with logging traffic.
- Turn left onto Brungle Rd soon after passing Tumut Airport.
- Route becomes quite ‘lumpy’ as it rises to crest Killimicat Hill before eventually levelling out as Brungle is approached. Exercise due care descending Killimicat.
- 40 km return distance turnaround is at Brungle village if desired.
- 47 km return distance turnaround is at Brungle Bridge if desired.
- To continue on to Gundagai (75 km return distance), cross over the Tumut River at Brungle Bridge.
- With the river flats left behind, the road again steadily rises to cross over the Tarrabandra Hills. This climb is rewarded by a long, fast descent to Jackalass locality.
- Turn right at the T-intersection GIVE WAY sign and cross the Murrumbidgee River by way of the remaining iron section of historic ‘Prince Alfred Bridge’. Take care here to avoid dropping your skinny wheels into gaps in the bridge decking!
- A hard left at the end of the bridge brings you down onto the Murrumbidgee River flats. Pass under the now disused railway trestle viaduct and enter Gundagai town centre either by Homer St (straight ahead), or by Landon St & Otway St (left turn beside the Golf Course).
- At Gundagai there are public toilets, located in Carberry Park behind the Tourist Information Centre, as well as a number of food and coffee outlets along the main street (Sheridan St).
- Return to Tumut by way of outward route.
Adequate fluid and nutrition requirements should be carried as there are no resupply points between Tumut & Gundagai.
PLEASE NOTE There is log haulage by semi & B-Double trucks on the Wee Jasper Rd between Bombowlee Creek Road turnoff and Tumut most week days. Any weekend activity is generally on Saturday but cannot be forecast with any certainty.
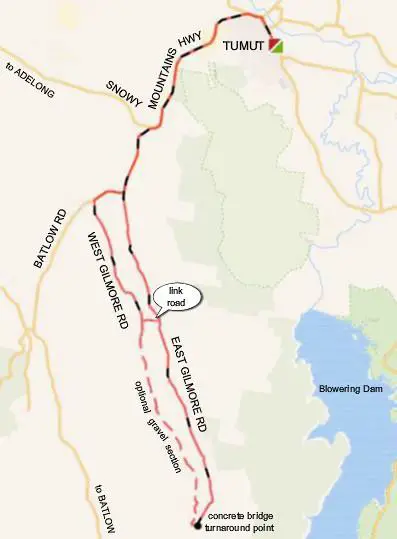
Gilmore Valley – 53km (Medium)
The two roads which run up the Gilmore valley either side of Gilmore Creek – East Gilmore Rd & West Gilmore Rd – are both quiet and not at all difficult for riders of intermediate road experience. Local cyclists often head for the shelter afforded by the valley when conditions are far too windy on other routes. It should be borne in mind, however, that the Snowy Mountains Hwy has to be negotiated between Tumut town and the Batlow Rd intersection, and then a shorter section of Batlow Rd up to the Gilmore turnoff (see ‘PLEASE NOTE’ below).
- Head out of Tumut along Fitzroy St & Adelong Rd (Snowy Mountains Highway).
- Follow the highway, past several timber mills, to a significant intersection where the road to Batlow and Tumbarumba enters from the left. Turn left from the slip lane.
- 3 km further along, Batlow Rd veers sharply to the right while East Gilmore Rd intersects from straight ahead. Proceed up East Gilmore Rd.
- A pleasant, undulating peddle through grazing country eventually brings riders to a concrete bridge adjacent to “Burranjoey” property gate. Time for a snack!
- At this point there are three options for return journey back down the valley:-
- Turn around & retrace your outward route all the way back to Tumut.
- Turn around & retrace your outward route 9 km back down the valley to a minor linking road on your left, which crosses over the Gilmore Creek to join with West Gilmore Rd. Take this short link road then swing right onto West Gilmore Rd and follow to its T-junction with Batlow Rd at a GIVE WAY sign. Right onto Batlow Rd and follow it for 1.2 km to join up with your outward route from Tumut.
- Cross the concrete bridge to West Gilmore side. From here, for the next 7 km, the road is generally hard-packed gravel with eight stock grids to negotiate – with care this section is usually passable in dry weather on a standard drop-bar road bike. The biggest problem you might encounter is dodging the cow manure on the road! At length the gravel gives way to tar seal which continues on for 8 km to the GIVE WAY sign at a T-intersection with Batlow Rd. Turn right onto Batlow Rd and follow it to join up with your outward route from Tumut.
Adequate fluid and nutrition requirements should be carried as there are no resupply points on this route.
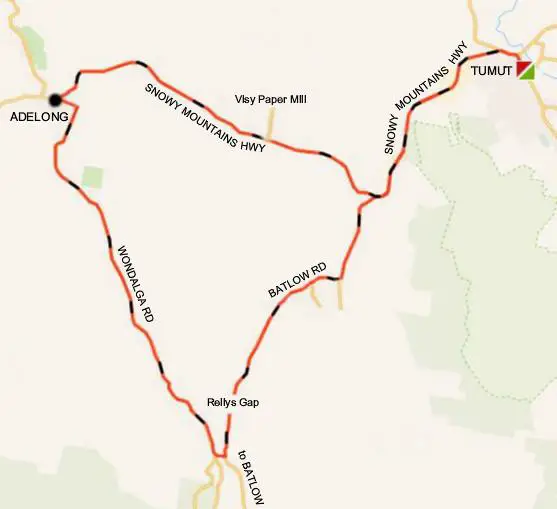
Wondalga & Adelong Loop – 52km (Advanced)
This route is for the more advanced cyclist who has some experience with riding on main trunk roads and rural highways – (see ‘PLEASE NOTE’ at bottom of this page). There are a couple of sizeable hill climbs to tackle but these should not present too much difficulty for the seasoned rider – as hill climbs go, they are not monsters!
- Head out of Tumut along Fitzroy St & Adelong Rd (Snowy Mtns Highway), past several timber mills, to a major intersection where the road to Batlow and Tumbarumba enters from the left. Turn left from the slip lane onto Batlow Rd.
- After about 8 km the road ramps up to the steepest climb of the whole route, the top of which is locally known as ‘Reilys Gap’.
- Refreshed by a rest & snack, it is now a fast roll down the other side but you need to be braking in time to take a well sign-posted right hand turn at the bottom of the hill. Cross over the Adelong Creek and swing another right at the Wondalga Fire Shed.
- You will now be on Wondalga Rd which shadows Adelong Creek most of the way down the valley to Adelong.
- Your approach into Adelong is over ‘Rimmers Bridge’ straight onto Selwyn St. Turn left near the end of Selwyn St into Tumut St, and then right onto the Snowy Mountains Highway, crossing over Adelong Creek on ‘Herb Feint Bridge’.
- A steady climb takes you to the top of Adelong Gap, followed by a long, thrilling descent. Pass by the Visy Paper Mill access road and you are on the final, easy section back to Tumut.
PLEASE NOTE There is log and container haulage by semi & B-Double trucks on the Snowy Mountains Highway and Batlow Road to and from Tumut, Adelong, Batlow and the Visy Paper Mill most week days.
Any weekend activity is generally on Saturday but cannot be forecast with any certainty.
For your safety it is recommended that the above two routes (Gilmore Valley, and Wondalga – Adelong Loop) only be attempted on a Sunday.
Download details of the above rides here.